Tuesday, August 2, 2016

Turbo Auxiliary Coolant Temperature Sensor Pipe Modification

One of the accommodations needed to be made when outfitting a new turbo that does not use a KKK center section is to re-route the coolant temperature sensor for the auxiliary coolant pump. The sensor triggers the coolant pump to turn on and off after the car has been shut down to continue to flow through the turbo to reduce wear. It can cycle many times after the car is turned off to accomplish its job. Basically this functions as a OEM turbo timer.

The turbo I have replaced the K26 with is a Garrett GT3076R. The GT30 uses a 14mm x 1.5 fitting on both sides of the center section for cooling. To adapt to a more common fitting size I used a 14mm male to -10AN male. -6AN and - 10AN are the most readily available center section adapters for the GT. I choose to go with the larger -10AN to ensure maximum flow. A 1/2" copper crush washer on the 14mm side that connects to the turbo is also necessary.

To modify the sensor pipe we first need to cut off the banjo fitting/pipe that is attached to the sensor mount (I borrowed the general idea for the modification from Paulyy on Rennlist). Using a hacksaw and a bench vise to hold the pipe you can make quick work of this. Depending on the cleanliness of the cut you may choose to smooth the surface with medium grit sandpaper. Next, I drilled the hole to the necessary size for a 3/8" x 18 NPT tap. Required drill sizes are either 37/64" or 9/16". Then tap the hole with the 3/8" tap. This will allow us to a 3/8" NPT to -10AN adapter fitting. Make sure to use thread sealant on the fittings. After cutting I painted the pipe with VHT engine metallic titanium silver blue.


The layout of the adapters is as follows. On the sensor side starting with the nearest to the turbo 14mm male to -10AN male > 90* swivel -10AN female to -10AN female > -10AN male to 3/8" NPT. On the auxiliary coolant pump side 14mm male to -10AN male > -10AN female to -10AN female coupler > -10AN male to 10 push loc hose barb.
 
Due to the very tight center section of the GT series turbo and the close proximity of the hot side clocking bolts the 90* swivel adapter is going to have to some problems fully tightening down on the 14mm adapter in most scenarios. One option to replace the 2 clocking bolts with low profile bolts (similar to what is used near the oil drain). Alternatively you can file down the points on the front 1/3 of the swivel adapter to gain enough clearance to pass the bolt; I ended up choosing the later. 


Thursday, July 28, 2016

Power Steering Hard Line Cooler Hose and Clamp Discussion

One of the power steering hoses off the reservoir on my car was in pretty poor shape. Of course it is the one with the cooler hardline integrated (since I replaced the other hose already). This part is expensive if you go for a OEM replacement because it comes with the cooler hardline coil and crimped hose as one unit. To add to the frustration the hardline end is a different diameter then the reservoir.
 
Thankfully Bruce at Arnworx has taken some of the annoyance out of this job by having a nicely preassembled hose with a protective heat shield over the 90* bend area where the hose meets the bending reducer. Available here. Installation is pretty straight forward so I'm not going to cover that but instead I'm going to talk about why the old hose was in such poor shape.
 
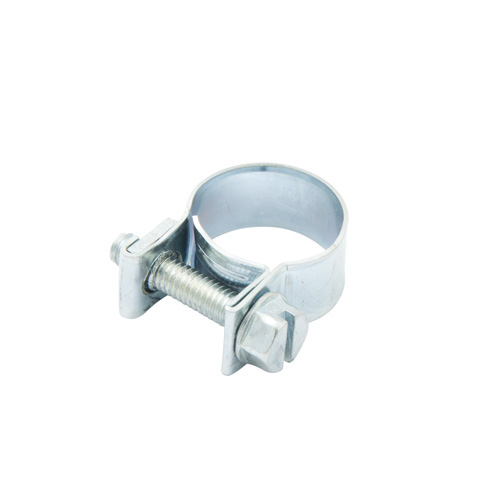
The main reason was a result of a low quality hose clamp. There are a wide variety of clamps on the market and in my experience the kind that was installed on this hose are the worst. They are the perforated worm clamp. Because of the punched out metal to make the screw track these leave large impressions on rubber hose. Silcone hose and couplers are even more susceptible to clamp damage then rubber so a quality clamp is essential when using Silcone. A better solution is either an embossed worm style clamp, fuel injector style, t-bolt or other clamp that has a solid continuous protective surface on the inside. Thankfully most of the factory clamps on the 944 are Norma brand embossed worm style so this is generally not an issue but worth thinking about if you are going to be replacing aging clamps.


Embossed Clamp
 
Worm Clamp
Fuel Injector Style Clamp
 

Friday, July 15, 2016

Fuel Tank Cover Strap Refurb

While replacing the fuel strainer at the lower part of the fuel tank I noticed that the support strap for the fuel tank lower cover was pretty rusty. In fact it looked like it spent a little too much time at the enchantment under the sea dance. I figured while I was down there I should probably refurbish the part.

Before
 
In addition to paint, the factory also installed some cushioning foam to the top of the strap where it contacts the covers and gas tank. Very similar resemblance to foam weather-stripping from home improvement stores. I was surprised to see on the Frost King packaging that it states: "Many automotive and marine uses". 
 
Step 1: Using a grinder or drill wire wheel as much rust, old paint..etc from the part as possible. I used a grinder with a 4" brass wire wheel. Ideally a media blaster is best for this type of work but I don't own one.
 
Step 2: Clean/Wash/Dry the part to prepare for painting. I cleaned it with simple green and a scrub brush, then rinsed with water. Brake cleaner is another popular choice.
 
Step 3.1: Paint the part. For this piece I am using 2 different paints. The first is a rust converting paint such as Rustoleum Rust Reformer. Even though I probably removed the majority of the rust during step 1 this goes the extra mile to be sure its not coming back. 2 light coats of Reformer about 10mins apart followed by a 24 hour drying cycle.
 
Note: If you are going to paint inside like I had to due to weather conditions make sure you have a vapor respirator mask. You can make a "booth" area out of some old cardboard and hang it from an A frame ladder, just be creative!
 
 I ended up using a bit more brown paper then pictured on the sides to catch overspray.
 
Step 3.2: Follow up with VHT Chassis satin black as the top coat. 2 light coats followed by 1 medium "wet" coat, allowing for 10mins drying between each application. The part should be ready to handle in 3 hours.
 
Step 4 (Optional): Apply Frost King adhesive weather-stripping to the section of the strap that contacts the gas tank and lower covers. If needed use 3M Super 77 for additional adhesive on weather stripping. Clamp for about an hour to assist the glue. Super 77 is pretty tacky, so you'll need rubbing alcohol for removing any extra.


Step 5: Bask in the glory of knowing no one will notice your hard work on this part hidden away under your vehicle.
 

Finished!


Monday, July 11, 2016

General Project Update

Project update as of early July 2016.
 
I'm waiting on the collar nut for the timing roller and a few other random parts. I also need to send some parts to the local plating shop to get a new yellow zinc chromate finish.
 
LR Stage 2 cylinder head after decking to remove o-ring grooves (Performed at Windsor Automotive Machine)
 
 
Cyl 1 @ TDC with the gasket on
 
If you look carefully you might be able to see the alignment marks I scribed on the balance shaft housing.
Extra help with alignment for a no cover install.


Saturday, July 9, 2016

Fuel Damper/Fuel Pressure Regulator and Jumper Hose (Fuel in Vacuum Lines)

The fuel damper and associated jumper hose have been a source of problems for these cars especially as they get older. The rubber hose is the most straight forward as it tends to get rock solid with age and eventually becomes a location for a fuel leak.
A failing fuel damper and/or fuel pressure regulator is a bit harder to identify. Symptoms consist of fuel in the vacuum line at the back of the damper/regulator which in severe cases can travel into the intake manifold or even the KLR vacuum line. Since the KLR line is clear you can actually spot the fuel traveling in the hose (See photo 2 below, the trapped gas is inside the circles). Others symptoms are hard to near impossible hot starts and fuel pressure loss over time at the rail causing long, lazy starts. In the case of the difficult hot starts this is likely due to the fact that as the gas migrates its way down the clear vacuum line and arrives at the KLR computer sensor it really confuses the system; when the gas eventually dries out near the computer things will appear to operate as normal for a brief period until the cycle repeats again.
Replacement on the bench if the rail has already been removed from the car can be a bit tricky since it can be a bit awkward to gently yet firmly clamp the rail to a work area to allow removal of the large nut securing the damper to the rail. Mine was particularly stuck and required me to use a chain whip vise grip on the damper to provide enough counter torque against a breaker bar.

Gas in KLR Vacuum Line (Image: 951North - Rennlist)

Friday, July 8, 2016

Flywheel Measurements and Pins

Switching to a aftermarket flywheel? Or perhaps you have acquired a flywheel with missing or removed "grub screws". I have taken a few measurements off the factory 87 flywheel which should assist in setting the screws to the correct height. This is important because the screw is what the factory sensor reads to determine engine position. If it is not set to the correct height you can get problems from erratic starting behavior to no starts. When setting the pins to the final height use some Loctite thread locker to ensure they stay at the desired height.
 
As a side note the stock flywheel has 3 screws, 2 on the same plane and 1 further back on a different plane. Most aftermarket wheels only have 1 screw. The stock Motronic engine managements uses a 132+1 setup. The 132 is the number of teeth on the ring gear mounted to the outside of the pressure plate, the 1 is the grub screw on the flywheel. So as it turns out 1 screw is all that is required as the other 2 are not used by the stock Motronic (I believe they were for a TDC sensor which was never implemented).


The SPEC scallop steel flywheel that will be replacing the stock wheel is pictured below. I set the pin tip to inside lip (a) to 119mm by adjusting the grub screw. Use some type of Loctite thread locker on the grub screw (I used the medium strength blue variety). The (b) measure was the same which it should be. The SPEC wheel overall has a slightly larger OD then the stock wheel, this results in the pin tip to outside lip measure being less than the stock wheel. If you had only taken the pin measure (c) from stock and set it for the new wheel the pin would have been 1.25mm too high.
 
 
To SPECs credit the new wheel comes with TDC markings already on it which is great. The upper mark where the factory OT and line would be is a little faint and I figured in a dark engine bay through the bell housing inspection port it might be difficult to see. I used a bit of pink nail polish to highlight the area.
 
Camera had a hard time picking up the engraved line for TDC mark but it is there.
 I also thought it would be worth mentioning here that SPEC flywheels made prior to May 2017 are the ones affected the increased diameter sizing issue. A secondary problem created by the increased size is in some cases it will create interference with the square wave signal the crankshaft flywheel sensor uses. Lindsey Racing has documented the issue here and offers a simple solution.

Thursday, July 7, 2016

Oil Pump Eccentric Tensioner Stud and Collar Nut

If you have switched model year engines at some point you'll know there were a lot of minor changes here and there which cause headaches at every turn. Since the 86' block uses the eccentric timing belt tensioner it requires a mounting stud and collar nut (#8 and #9 below) for the block. The stud part # 944 102 243 00 is generally difficult to find and is supposed to be no longer available. The specs for the stud are M10 x 1.5 thread x 101mm long. (On very early model cars it was 106mm long).


I was able to source some ASTM A193 Grade B7 (which is a bit better than 8.8) M10 x 1.5 yellow zinc chromate plated steel rod from McMaster Carr (#98942A116) which I will use to create the stud.
 
First step was to measure and mark with permanent marker the desired length of rod (I choose 106mm) as this gives a little extra wiggle room and you could easily fit 110mm without any clearance issues.
 
 
Next I grabbed a piece of scrap 2x4 and drilled the nearest standard size hole in the 2" side (I mostly only have standard size drill bits laying around). Then take a wood saw and cut a slot down the center of the 4" side. This will be where the hack saw will ride when the rod is mounted to our wooden jig. Place the rod into the jig noting your mark for length, looking for it in the center slot with a flash light. Now is a decent time to double check with a ruler or caliper the length to the center cut to ensure you got it right. Secure the rod with M10 nuts on each side.  
 
 
I then clamped the jig in a bench vise and used a jack stand to hold the extra rod up as this piece was 1m long. Using a hack saw cut through the center slot. Once completely cut you can use the nut which is already threaded on your new stud to help clean up the threads. Sandpaper or a file could also be helpful if the cut was not very clean.
 
 
Presto! A new 106mm stud without any damage to the threads from clamping.
 
 
As for the collar nut (aka flange nut, aka shoulder nut) Part # 944 102 243 00 it is 13mm overall height. This is not exactly a common size for a M10 x 1.5 flange nut. Solutions for this are to either stack a 3mm thick washer behind the more common M10 x 1.5 (10mm overall height) flange nut or to buy the part from Porsche, Pelican, Auto Atlanta..etc. As of 7/2016 the nut costs about $8
 
Special thanks to Van Svenson for measuring the stock collar nut.

ARP Cylinder Head Stud Kit

The stock cylinder head studs on these cars are one time use stretch design. They need to be replaced with either new factory stretch bolts or you can source reusable hardware from the aftermarket such as ARP or Raceware.
 
A quick note on removing the old studs. The factory used red Loctite to secure the studs to the block making them extremely difficult to remove. You may have success with double nutting the stud to remove it. If not the only other option is to weld a nut directly to the stud.


Installation is fairly straight forward but the most critical step is to ensure that the holes and threads in the block are clean. I used a variety of cleaning methods including (Shopvac with a long tube attached) while using compressed air with a long straw attached to dislodge and collect any large debris. Then I used brake cleaner, rotated the engine over on the stand so the deck surface was facing down and collecting all the cleaner with a paper towel. If the threads are slightly distorted you can chase them with a M12 x 1.5 cleaner/chasing tap (Which is different then a normal cutting tap). Alternatively if you have old head studs around you can make a cleaner by cutting a few v-grooves with a file into the threads.
 
The studs, nuts and washers should be installed with a coating of ARP ultra torque fastener lubricant. This stuff is great, its superior to anti-seize and gives accurate torque readings. Install the studs into the block hand tight only and test fit the head gasket and head for any unusual binding. Don't forget to reinstall the 2 alignment pins in the cylinder block if you had it surfaced. If everything checks out begin the 3 step torque process (Follow diagram below for sequence). 20ft/lbs then 50ft/lbs then 75ft/lbs. Best case letting the head settle for several hours between each stage.  


Thursday, June 30, 2016

Throttle Position Sensor (TPS) Pin Layout & Removal

The protective heat shrink tubing on the wires for the TPS and AFM harness on my car were not in good shape, the tubing had become hard and brittle and was starting to look pretty sad. Surprisingly, the wires under the tubing were in good shape. So, I needed to remove the TPS connector so I could slip new protective tubing over the wires.
 
The TPS sensor is a AMP junior timer series connector. To remove the pins from the connector insert a 1.2mm screwdriver or 2 prong remover tool (Lisle Toolin the front of the connector in the small square at the bottom. Once it is fully seated you might hear a small click/clunk which is the metal tab at the bottom of the pin being pushed up. Remove the tool and insert the screwdriver in the middle area of the pin and push it out of back.
 
Below is a layout diagram of the TPS connector which should assist during reassembly.
 
 
1 - White/Black
2 - Empty
3- Brown
4 - White/Green
5 - White/Blue
6 - White/Red
 
Final Result
 

Tuesday, June 28, 2016

Headgasket Thickness & Compression Ratio

Determining what thickness of head gasket to use on a modified 951 motor was a bit of a trip down a rabbit hole. The information scattered about the internet had a wide variation of opinions on what to actually use. I eventually had a lengthy discussion with a well respected engine builder about exactly what thickness to choose and why to choose it.
 
But first a little background as to why I thought I might have needed a thicker gasket in the first place. The cylinder head that is to be used for this project was originally a Lindsey Racing Stage 2 with LR springs and moly retainers. In addition it was o-ringed for the stock 100mm bore size. The problem was Cometic MLS head gaskets should not be run with a o-ringed cylinder head.
 
This is a quote directly from the Cometic website in the technical support section:
 
Can MLS head gaskets be used with motors setup with o-rings or receiver grooves around the cylinder bores?
 
No. MLS head gaskets require smooth, flat and true head and deck surfaces to seal. Most of the time with o-ring setups the wire and groove fall where our gasket’s combustion seal is located; therefore, the wire will hold the gasket and not allow proper compression while the receiver grooves allow combustion gases to escape."
 
So the first problem to solve was machining the old cylinder head down to a flat surface below the o-ring grooves so that the new gasket will seat properly. This required the removal of .03" of material, leaving the cylinder head at 22.83mm as measured from the factory "L shaped" measuring point A. For reference a stock cylinder head is 24mm +/- .1mm
 
 
This reduction in cylinder head height had me concerned about the overall impact on the engine compression ratio and engine timing.
 
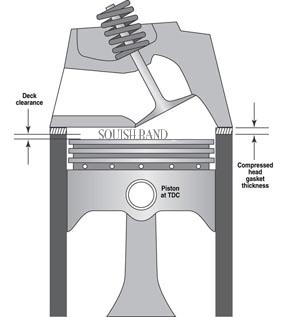
However, it turns out that in reality the real critical dimension for these engines is actually the piston to deck clearance. As the name suggests its the measurement of the piston at TDC vs the height of the deck. Negative numbers mean the piston is below the deck, positive above.
 
There are a bunch of different ways to obtain this measurement but this is how I did it. I brought the cylinder piston to TDC with dial gauge and bridge via sweep method, taking the measure along the center line. Zeroed the dial for the TDC level. Then I moved the dial gauge over to the deck, over the centerline and recorded the difference. I took a measure at both the piston front and rear.
 
As long as the you have zero to negative piston to deck clearance you can and should use a stock thickness (.0433") gasket to maintain the ideal quench/squish. A good write up about quench can be seen here. In short .04" is the magic number If the compression ratio is increased as a result of keeping near it, most likely it can be handled in a better way with engine management. For my particular build since I'm already outside the scope of the stock management with the increased bore size  the standalone system will easily be able to accommodate the adjustment.
 
 
His advice was confirmed in Turbocharging Performance Handbook by Jeff Hartman that I had on the shelf. On page 86 he discusses installing thicker head gaskets and the squish effect very briefly saying:
 
"Worst of all, it could degrade the "squish" effect in the combustion chambers, which can actually be a greater pro-knock factor than a little more compression.... It is critical that a compression lowering strategy not mess with the squish ring."
 
When you have positive values (ie: the piston is actually protruding above the deck at TDC) then you will need to go to a thicker gasket by adding the clearance number to .0433" to get the ideal size.
 
Using the Summit Compression Calculator I was able to find the new compression ratio with the following information of the build.
 
Bore: 104mm
Stroke: 78.9mm
Cylinder Head Volume: 48.5cc
Effective Dome Volume: 33.4cc
Deck Clearance: -.009in
Compressed Gasket Thickness: .045"
# of Cylinders: 4
 
Results in a 8.47:1 Static Compression Ratio.
 
Hopefully this helps clear up some of the misinformation floating around the internet.
 

Sunday, June 26, 2016

Piston Volume Measurement

Knowing the volume (dish/dome) of the piston is an important factor in the engine compression calculation. In general the manufacturer provides the volume spec but what if you have a piston of unknown spec? In that case you'll need the measure its volume with a fluid and do some math.
 
First thing I did was get out a dial gauge and a dial gauge bridge. I zeroed the dial gauge of the deck surface where the Plexiglas cover for the volume measurement will rest. I also rubbed a light layer of oil near the upper bore to help assist the piston ring seal (since we will later be filling this area with liquid).
 
 
Next I positioned the dial gauge over the piston edge and rotated the crankshaft until the desired piston was near the dial gauge probe. Since I wanted the piston to be set .1inch below the zeroed deck (2 rotations of the dial gauge). (Side note: I like to use a rubber strap wrench on the crank drive gear as this make rotating the engine super easy and causes no damage). 
 
 
Now that cylinder 1 is at a known depth I prepared the other necessary items. These included Jeg's economy cc kit, Vaseline, rubbing alcohol (Water would be fine also) and food coloring. Food color your liquid for added visibility.


Fill the syringe with 60cc of liquid, purging any air bubbles. Apply Vaseline to the deck surface where the Plexiglas plate will sit to create a seal. Then dispense into the plate hole until the entire area is filled. This may require you to reposition the fill hole over any trapped air bubbles to get an accurate measure. You can suck out the liquid with the syringe to reuse it and make cleanup a bit easier.
 
 
Record the volume remaining in the syringe for the cylinder and repeat for remaining pistons. Subtract the remainder from 60cc to get the volume.
 
My measurements came out in the 55 to 56cc range. I used 55cc for the next calculations.
 
To determine the volume of the unknown space we need to subtract away the volume of the cylinder above it. This was why we needed to know the depth earlier so we know the cylinder height. The bore of this motor is 104mm, which is the cylinder diameter.
 
h = .1in = 2.54mm
r = 104mm/2 = 52mm
 
Volume of a cylinder = PI * r^2 * h
V = PI * 52mm^2 * 2.54mm
V = 21,576mm^3 * (1cm^3/1000mm^3)
V = 21.58cm^3 (cc)
 
Now we can subtract out the extra volume from our measured volume.
 
55cc - 21.58cc = 33.42cc
 
33.4cc is the piston (dish) volume.
 
Additional Note: Make sure you do a good job of soaking up all the remaining liquid in the chamber, then recoat the cylinder bore with a light film of oil. Turn the engine over a few times to be sure you got it all. 

Friday, June 24, 2016

Clutch Fork Bearing Removal/Installation

Removing and installing the bearings in the clutch fork can be a bit of a tricky task. Some people have reported that you can hammer them out with a bolt just about the same size as the bearing. I tried this with a few blows of a 3lb dead blow hammer but it did not seem to be the best way to go about doing it. Additionally, I tried a C-clamp but I wasn't able to apply enough leverage to the handle to get them moving.
 
A bench vise is a better solution but unfortunately the jaws on mine were not wide enough to fit the fork and a 5/8" socket to press in. I needed something thinner but still the same diameter.
 
The solution was to use nickels which you can gradually stack up and tape in place until you get the bearing pressed out about half way. Then I was able to use the 5/8" socket to finish the job. You can use a piece of masking tape to help keep the stack lined up and in place.
 
 
To install the new bearings place a nickel over the bearing face to protect it from the vice and slowly press in. I had difficulty getting them lined up exactly square so I placed the bearings in the freezer for a few hours, problem solved.
Press bearings from inside to outside of fork in direction of arrow 

Once halfway then was able to finish with the 5/8" socket